Welcome to thatlinuxbox.com Thursday, July 16 2026 @ 09:43 PM UTC
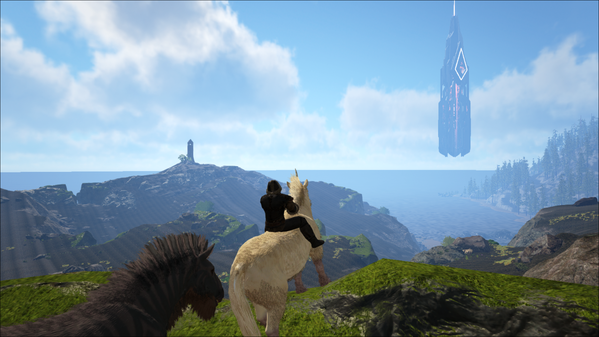
More Screenshots of ARK: Survival Evolved on Linux

- Saturday, August 12 2017 @ 12:17 AM UTC
- Contributed by: Dan Stoner
- Views: 8,739


I thought I would post a few more screenshots.
The most recent patch (264.36 released on August 9, 2017) seems to have fixed a rendering bug (where water texture did not render properly) that was introduced a few patches ago. Also, I note that ARK seems to load a LOT faster now on Linux. I have not had a chance to see if Caves are still broken / unplayable on Linux due to rendering bugs like this:

The GOOD news is that the game continues to improve. These screenshots are from the free Ragnarok DLC huge expansion map:


The following screenshots are from older patch levels and / or other maps:
- read more (15 words)
- Comments (0)
Don't trash your Torch router just yet
- Friday, August 11 2017 @ 10:57 PM UTC
- Contributed by: Dan Stoner
- Views: 21,086
"Torch. A simple router for digital parenting."
https://www.kickstarter.com/projects/...-parenting
I was apparently not a backer but bought the product through their store so I am unable to leave a comment on Kickstarter (backers only). Maybe a backer will find this blog and post a comment on Kickstarter for the rest of the unfortunate customers.
This Torch router apparently depended on having access to the Torch cloud services which have been shutdown.
https://www.pcwrt.com/2017/06/the-tor...-is-better
This all happened before I even had a chance to turn mine on for the first time.
However, thanks to the fine folks at pcWRT, I was able to flash a new ROM onto the Torch and I now have a working router!
I just followed the basic steps in their quick flashing guide:
- read more (189 words)
- Comments (0)
Python requests urllib3 SSL warning
- Tuesday, June 06 2017 @ 05:36 PM UTC
- Contributed by: Dan Stoner
- Views: 7,176
My Linux development computers are still running Ubuntu 14.04 which includes Python 2.7.
One of the libraries I commonly use to access websites or APIs from Python is "Requests: HTTP for Humans". Requests in turn leverages urllib3. The following warning began popping up a while ago when making requests to SSL sites:
InsecurePlatformWarning: A true SSLContext object is not available. This prevents urllib3 from configuring SSL appropriately and may cause certain SSL connections to fail. You can upgrade to a newer version of Python to solve this. For more information, see https://urllib3.readthedocs.io/en/latest/advanced-usage.html#ssl-warnings
The solution is actually quite simple (especially if one is developing in a virtual environment), using pip install with the extra bits including the brackets:
$ pip install urllib3[secure]
From:
https://urllib3.readthedocs.io/en/latest/user-guide.html#ssl-py2
If you aren't developing in a python virtual environment... start developing in a pyton virtual environment! I suggest virtualenvwrapper over vanilla virtualenv.
https://virtualenvwrapper.readthedocs.io/en/latest/
- Comments (0)
Screenshots of ARK: Survival Evolved on Linux
- Tuesday, January 17 2017 @ 01:03 AM UTC
- Contributed by: Dan Stoner
- Views: 9,469
Here is my desktop hardware, with the graphics card a new purchase at the start of 2017.
Ubuntu 14.04
Intel i3-2105 CPU @ 3.10GHz
ZOTAC NVIDIA GeForce GTX 1070 graphics card
NVIDIA Driver Version: 375.26
monitor native resolution: 1920 x 1080
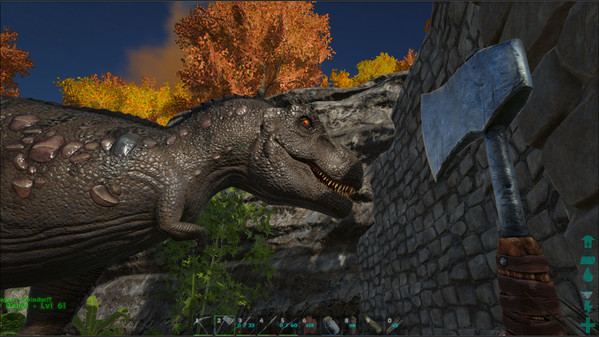
Rex vs. hatchet. Luckily, the T-Rex was already tamed.
Here are some more screenshots...
- read more (237 words)
- Comments (0)
Gate2Gate Trail Run 2016 - Race Report
- Wednesday, November 16 2016 @ 10:35 AM UTC
- Contributed by: Dan Stoner
- Views: 6,357

At dawn's first light, ready to go (I'm on the left wearing the Salomon S-Lab Sense Ultra Set Hydration Vest and Under Armour - The Flash compression shirt):

Photo Credit: Cathy Bester
The 50k and 25k runners started together with a real shotgun start (boom!):

Photo Credit: Cathy Bester
- read more (652 words)
- Comments (0)
Storm Trooper and Darth Vader Art
- Wednesday, August 24 2016 @ 11:59 AM UTC
- Contributed by: Dan Stoner
- Views: 8,405


- Comments (0)
 GitHub